Documentation · v0.2
Build a brain, and keep it true.
Everything from an empty folder to a knowledge graph Claude can query — what the tool is, how to install it, and a quickstart that gets you to a working brain before the coffee goes cold.
The rest of the manual is four pages: the concepts behind a brain, data sources and connectors, syncing and what indexing costs, and wiring it into Claude. Looking for a specific flag? The command reference has all of them.
What brainiphy is
Everything a business knows is spread across systems that do not talk to each other: proposals in a Drive folder, contacts and deals in a CRM, last year's numbers in a spreadsheet, meeting notes in somebody's Documents. Ask Claude about any of it and it has no idea. The information exists — it just is not anywhere Claude can reach.
brainiphy builds that reachable place, once per client. You point it at your folders and systems; it pulls everything in, indexes it into a knowledge graph, and wires that graph into Claude. It then keeps itself current in the background.
Four stages, left to right
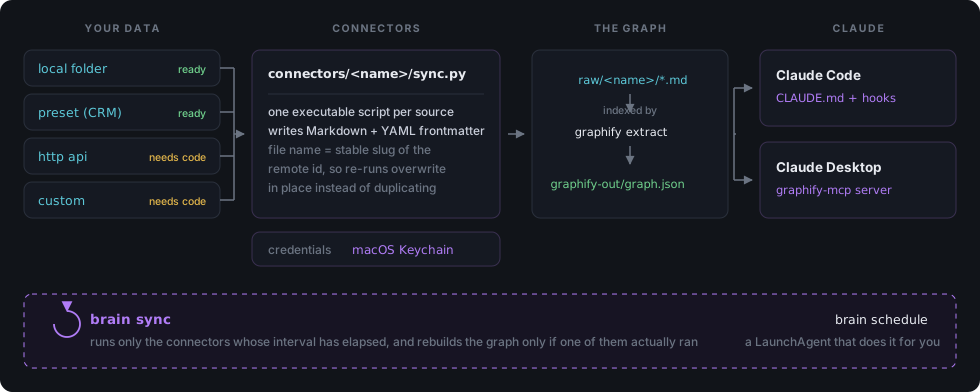
| Stage | What happens | Who does it |
|---|---|---|
| Your sources | Nothing is moved and nothing is uploaded. You tell brainiphy where to look — a folder on this Mac, an API base URL, a CRM sub-account. | You, once |
| A connector per source | One script per system, pulling records out and writing them all as plain Markdown into raw/. For a folder or a preset it is written for you. | brain new-connector |
| The graph | graphify indexes the normalized files into graphify-out/graph.json — the people, companies, deals and documents, and how they connect. | brain sync |
| Claude reads it | Claude Code works out of the box. Claude Desktop is one extra flag. | brain connect-claude |
The difference the third stage makes is the difference between a folder full of files and something that can answer which clients did we quote in March and never hear back from.
What you will need
- A Mac. Scheduling uses macOS's own
launchd, and credentials live in the macOS Keychain. These are the two reasons there is no Linux or Windows build. - Python 3.9 or newer — already present on almost every Mac.
- Nothing else. The installer brings in graphify and the two Python libraries it needs.
A model is needed to index documents, but not necessarily an API key — see indexing, models and cost.
Install
One command. It sets everything up in its own isolated folder, so it cannot disturb anything else on your Mac, and reports at the end whether it found what it needs.
$ curl -fsSL https://raw.githubusercontent.com/rvst312/brainiphy/main/install.sh | bashThen:
$ brainLook before you leap
Reasonable, for anything piped into bash. Download it and have it tell you what it would do:
$ curl -fsSL https://raw.githubusercontent.com/rvst312/brainiphy/main/install.sh -o install.sh
$ bash install.sh --dry-run
Outside its own folder the installer touches exactly three things: two shortcuts in ~/.local/bin, a marked block in your shell profile (backed up first), and a link that registers it with Claude Code.
Installer options
| Flag | Effect |
|---|---|
--prefix DIR | Where to put the files. Default ~/.claude/skills/brainiphy. |
--python BIN | Which Python to build with. Default: the newest python3 ≥ 3.9. |
--no-graphify | Skip the graphify engine. |
--no-path | Don't touch the shell profile. |
--no-skill | Don't register it with Claude Code. |
--uninstall | Remove everything it installed. |
--dry-run | Print what would happen and change nothing. |
Installing from a clone, for working on brainiphy itself or on a fork:
$ git clone https://github.com/rvst312/brainiphy.git
$ bash brainiphy/install.sh --prefix "$PWD/brainiphy"
Uninstalling
$ bash install.sh --uninstallRemoves the virtualenv, the two shortcuts, the marked block in your shell profile and the skill link. Your brains are your own folders and are left alone.
Quickstart
A complete brain for one client, from an empty folder to a graph Claude can query. This walks the seven steps by hand so you can see what each one does; in practice brain on its own runs the same sequence and tells you which step you are on.
1. Create the brain
brain init prepares an ordinary folder to receive connectors. It is safe to re-run: it never overwrites an existing registry.
$ mkdir -p ~/clients/acme
$ brain init ~/clients/acme
That writes connectors/registry.yaml and connectors/state/, adds the generated output directories to .gitignore, and adds connectors/ to .graphifyignore so your connector scripts are never indexed as content.
2. Add a source you already have
The cheapest source is a folder on this Mac — including a synced Drive or Dropbox folder. It is generated complete and works on the next sync.
$ brain new-connector ~/clients/acme docs --mirror ~/Dropbox/acme3. Add a source that needs a credential
For a system with a preset, you supply an account id and a token — no code. Run brain presets to see what ships today and what each one needs.
$ brain new-connector ~/clients/acme crm --preset gohighlevel --var LOCATION_ID=abc123
$ brain secret set graphify-acme-crm
The secret prompt is hidden as you type. The credential goes into the macOS Keychain and nowhere else — never into registry.yaml, never into a command argument.
4. Check where you are
brain guide reads the project and works out which steps are done, what is missing from the pending ones, and the exact next command. It only reads, so it is safe to run anywhere.
brain guide ~/clients/acme4/7 done ✓ done ▸ next ○ pending – n/a
✓ 1 Install graphify
✓ 2 Scaffold the project
✓ 3 Add data sources
▸ 4 Finish the custom connectors
not runnable yet: hubspot (needs code)
write the fetching for anything generated from a stub, and fill in the
account details a preset needs
$EDITOR ~/clients/acme/connectors/hubspot/sync.py
✓ 5 Run the first sync
○ 6 Connect it to Claude
not connected yet
brain connect-claude ~/clients/acme --desktop --trust-desktop
○ 7 Keep it in sync
not scheduled — sync is manual for now
brain schedule ~/clients/acme --interval-minutes 15 --load
↳ next step:
$EDITOR ~/clients/acme/connectors/hubspot/sync.pySteps can be done out of order, which is why 5 is ticked while 4 is not. A brain you set up six months ago usually only needs “add one more source”, and walking it through all seven to get there would be silly.
5. First sync
This pulls every source in and indexes it. The first build is always a full one, and it is the slow one — later syncs only run what is due.
$ brain sync ~/clients/acmeIt prints ran=[...] skipped=[...] errors=[...] graph_rebuilt=<bool> and exits non-zero if any connector failed, so it drops straight into a script or a CI job.
6. Wire it into Claude
$ brain connect-claude ~/clients/acmeThat connects Claude Code. Add --desktop to also register the graph with Claude Desktop, and restart Desktop afterwards to pick it up.
7. Stop thinking about it
$ brain schedule ~/clients/acme --interval-minutes 15 --loadmacOS now re-runs the sync on its own, whether or not a terminal is open. Logs land in connectors/logs/.
Build one for your next client this afternoon.
One brain per business. A folder on your Mac, a handful of scripts you can read, and a graph Claude can query.
$ curl -fsSL https://raw.githubusercontent.com/rvst312/brainiphy/main/install.sh | bash
$ brain